How to varnish an acrylic painting
Learn how to varnish an acrylic painting! It is essential that you varnish your completed acrylic paintings. The varnish will protect the painting from dust, UV rays and yellowing. Plus it adds a layer of shine that somehow, almost as if by magic, pulls the whole painting together and makes it look even more amazing, bringing out the gorgeous vibrancy of the colors. Trust me!
Varnish comes in gloss, satin or matte finish. I usually stick with gloss varnish because I love the look of a glossy finish, but you may have your own preference. You can mix any of these types of varnish to get the exact finish that you are looking for, but it will take some experimentation! Learning how to varnish an acrylic painting involves this kind of experimentation so that you get it just right.
One thing I want to quickly add at this point, is that if you want to photograph your painting, do it NOW - before it's been varnished. The varnish will inevitably cause a glare if light is flashed upon it, making it difficult to photograph. I always photograph and/or scan my paintings before varnishing. I've tried to photograph paintings after they've been varnished, and trust me, it's a pain in the patootey. It's possible, but it takes a lot of patience, trial and error, and a takes a lot of space on your camera's memory card.
Varnishing an Acrylic Painting
When you're ready to varnish, make sure that the painting is completely dry first. If it's the slightest bit wet, the varnish will mix with the wet paint and streak across the canvas. Unless that is your desired effect (hey, why not?), you will want to avoid this. Also make sure that the surface is free from dust, dirt, and any other undesirable things like lint.
To varnish, always keep a separate glass jar or plastic cup aside exclusively for varnishing. Don't use the same jar you use to dip your paintbrush in as you are painting! The reason is that there will inevitably be little bits of paint stuck and dried to the inside, outside, or lip of the jar. If these get into your varnish or onto your varnishing brush, they will then stick to your painting. Not cool! Likewise, I keep a separate brush just for varnishing, for the same reason. You can see and read about the brush I use for varnishing (this links to Blick Art Materials, and if you make a purchase I get a small commission that helps support this site). It's definitely worthwhile to keep a special brush aside just for varnishing. Because it won't be used frequently (unless you create a lot of paintings at a phenomenal pace), it will last a long time. Therefore, it's well-worth the small investment!
Rinse the jar in water before putting in varnish, because rinsing will wash out major dust particles. Likewise, give your varnishing brush a quick rinse as well.
If you make a purchase via the links below I receive a small commission, which helps support this site.
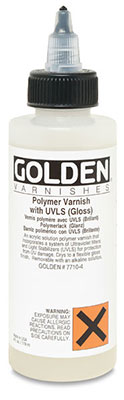
If you're using a polymer varnish like I am, then in the jar, mix the correct ratio of varnish and water as instructed on the bottle of varnish. (If you're using a Mineral Spirit Acrylic Varnish (MSA Varnish), do not mix the varnish with water, and instead follow the instructions on the bottle.) Try to mix out more than you think you'll need, to ensure that you'll have enough to varnish the painting in one go. It may take some practice to get this amount just right, but you'll soon get it as you learn how to varnish an acrylic painting. You can even save any unused varnish. I would just put a solid covering (like a lid, or something heavy like a book, or plastic wrap held in place with a rubber band) over the top of the jar, and then use it again in a couple days when I had finished another painting. I would recommend not keeping the varnish mixture for more than a few days though, because it does get cloudy. It's probably fine, but as a perfectionist I'd rather mix a whole new varnish concoction.
I use Golden Acrylic Polymer Varnish, which I also discuss here. This varnish is removable, so if for any reason it needed to be removed, it can be removed with an ammonia solution. For my own art, I've never had the need to remove the varnish, but it still seems comforting to have that option. Art conservationists say that it's preferable to have the removability option, in case the varnish somehow yellows or something needs to be cleaned. It's important to keep the longevity of the artwork in mind... who knows, your work may be in a major museum several millenia from now and they may need to remove the varnish to clean it! Why not make their job easier? ;)
If you use a removable varnish and you think that someday the varnish might need to be removed for any reason, you'll need to apply an isolation coat before you varnish the painting. The isolation coat acts as a barrier between your painting and the varnish, protecting your painting from the chemicals that remove the varnish.
To apply an isolation coat, use an acrylic gel medium or gel gloss such as Golden Soft Gel Gloss, diluted with water. For example, the packaging for Golden Soft Gel Gloss recommends mixing 2 parts Soft Gel Gloss to 1 part water, but follow whatever instructions are on the gloss medium or gel gloss that you choose. To apply the isolation coat, follow the basic steps outlined here for varnishing, because the process is similar, and allow at least 24 hours or more for the isolation coat to completely dry before applying your varnish.
If you want to know more about applying an isolation coat, check out this handy page on the Golden website, which also includes a note of caution because "isolation coats are also significant and permanent additions to a painting and inevitably will cause changes in the painting's surface qualities." Read more at the aforementioned link! (Also, note that you can still use a removable varnish on your painting, even if you don't apply an isolation coat - the varnish will still protect the painting, but it's best to never remove the varnish or you'll risk damaging the painting.)
The next step in how to varnish an acrylic painting:
Lay the painting flat while varnishing, and make sure it's in a place where it can lie flat and undisturbed for a few hours while the varnish dries. If you try to varnish the painting while it's hanging on a wall, for example, the varnish will just run down the canvas and drip all over the floor. And make sure that while the varnish is being applied and drying, the painting is in a place inaccessible by children and pets, as they are known to wreak havoc.
There is a chance that any excess varnish might drip down the side of the painting, so I always lay down a wooden board to protect the surface underneath. If varnish does drip over the side of your canvas or wood panel, there is a chance it might stick to the surface below. It's usually easily removable, but there's a risk of slight damage to the varnish on the painting. Therefore, if the painting is on a wood panel, I prop it up by putting something underneath that will lift it from the surface of the wooden board. For instance, I have a big tub of gesso that has a flat top. The tub is very solid and stable, so I know it won't fall over if accidentally nudged. If the painting is on canvas, I prop it up with four equally-sized objects underneath each corner, where the stretcher bars connect. Have a look at the illustration below to see what I mean:
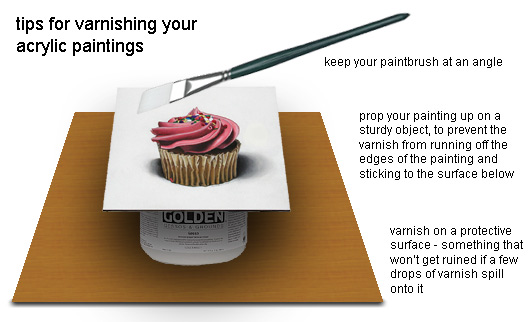
Dip the brush into the varnish about 1/3 to 1/4-way down the length of the brush and gently tap off the excess. Holding the brush at an angle, apply the varnish in even strokes across the painting, moving the brush in the same direction each time. Start at one corner and work your way across the whole painting in a parallel fashion.
When you are done, look at the surface of the painting from an angle. If there are any parts that are not shiny and wet, gently go over it with a bit of varnish. It helps if you shine a light on it, because the wet, varnished parts with sparkle in the light. If you see any dust or other debris that may have fallen into the varnish, gently and carefully pull it out using a toothpick or some other small, pointed object. Sometimes I use my fingernails for this (even though they are not pointy).
Allow a few hours for the varnish to dry, according to the time indicated on the package. Then you may or may not want to give it another coat of varnish. Sometimes the varnish doesn't cover completely evenly the first time around, so another coat will even everything out. I usually give my photorealist paintings 2 coats of varnish. I let the first coat dry for about 3-4 hours, then I gently touch the surface with my freshly-washed finger to ensure that it is indeed dry. Then I apply the second coat of varnish in the manner described above.
When you're done, carefully and thoroughly clean the jar and the brush, and keep them someplace safe where they won't collect any dust.
Congratulations! Now you've completed your acrylic painting!
Level-up Your Painting Skills!
Learn more about the basics of acrylic painting with these video courses on Skillshare. Get started right away with their 14-day free trial or use the code ARTISFUN30 to get 30% off annual membership! As an affiliate to Skillshare, we get a small commission that helps support this site.
This is Page 15 of a 15-page guide explaining how to paint photorealistically.
Read More
Read a current and historical overview of Photorealist painting techniques and methods. It is beneficial to familiarize yourself with this information before you embark on your own journey to create photorealistic paintings.
Familiarize yourself with the Photorealist art movement by reading my overview of Photorealism.
Here's an enlightening step-by-step visual guide about how to paint abstract art in acrylics. If you like colorful artwork and want to learn techniques for creating your own funky paintings, this guide is for you!


